1. Begin by removing the old Aerogarden tomato plants from the grow deck. Use scissors to cut off any dead leaves and roots before transplanting them into a new soil environment.
2. Choose an appropriate pot or container for your tomato plant, making sure it is large enough to accommodate the root system of your Aerogarden tomatoes and has proper drainage holes at the bottom so that water can drain out easily when watering your plants.
3. Fill the pot with a well-draining soil mix suitable for tomatoes, such as one made from composted manure and coco coir blended with some horticultural sand or perlite for added aeration and drainage benefits.
4. Carefully remove each tomato plant from its Aerogarden grow deck, taking care not to disturb too much of their existing root systems in the process if possible (too much disturbance may lead to shock). Place each individual plant into its own hole within the newly prepared soil mixture, ensuring that you add in some additional fresh soil around each root ball as needed.
5. Water thoroughly after planting until moisture starts dripping out of the drainage holes at the bottom of your containers; then let stand until all excess water is absorbed before continuing on with regular watering according to your normal schedule going forward!
- Prepare the New Container: Choose a container that is at least 6 inches wide and 12-14 inches deep
- Fill it with a well-draining potting soil mix, making sure to leave enough room for the tomato plants to fit comfortably
- Dig Up Plants Carefully: Gently dig up your Aerogarden tomato plants, being careful not to damage their roots as you do so
- If possible, try to bring some of the original growing medium from the Aerogarden with them when transplanting into your new container
- Place Tomato Plants in Soil: Place each tomato plant in its own hole in the soil mixture so that they are spaced out evenly apart from one another and fill any remaining gaps between them with more soil until all of the holes are filled up completely
- 4
- Water Thoroughly After Transplanting: Once all of your tomato plants have been placed into their new containers and pots, give them a good watering until there is no longer any standing water around them or on top of their leaves/stems – this will help ensure that they don’t suffer from shock due to dehydration after transplantation!
How to Transplant Aerogarden Plants
Transplanting Aerogarden plants is a great way to give them more room to grow. First, you’ll need to remove the plant from its Aerogarden pod and carefully transfer it into a new pot filled with high-quality soil or compost. Water your newly-transplanted plant well and place in a bright location, making sure not to expose it to direct sunlight at first.
With regular watering and care, your Aerogarden plant should thrive in its new home!
How to Transplant from Aerogarden to Soil
If you’re looking to transplant your Aerogarden plants into soil, the best time to do so is after they have grown at least a few inches tall. Make sure to use a potting mix with good drainage and add compost or fertilizer if desired. When transplanting, it’s important to keep as much of the root system intact as possible when taking out of the Aerogarden and be careful not to damage any roots during planting in soil.
Water thoroughly after transplanting and remember that it may take some time for your plants’ new environment to adjust before you start seeing growth again!
How to Transplant Aerogarden Herbs
Transplanting Aerogarden herbs is a great way to keep your garden healthy and vibrant. To begin, remove the plants from the Aerogarden unit, taking care not to damage their root systems as much as possible. Then, prepare a new pot with soil that has been watered beforehand and place the plant into it so that its roots are completely covered by soil.
Finally, water your newly planted herb generously and place in a sunny spot for optimal growth!
Transplant Aerogarden Lettuce
Transplanting lettuce in an AeroGarden is a great way to enjoy fresh, homegrown produce all year long. One of the best features of this system is its automated watering and light cycle which makes it easy to keep your plants growing healthy. The AeroGarden also has pre-programmed settings for different types of vegetables so you don’t have to worry about adjusting the settings yourself when transplanting.
To get started, simply fill up the reservoir with water and plant your seedlings according to the directions on the packet, being sure to leave enough room between them for proper growth. After planting, turn on the light cycle and let your garden do its thing!
How to Plant Aerogarden
Planting in your AeroGarden is easy and fun! Begin by filling the water reservoir with tap water. Then add the nutrient tablets to the reservoir following package instructions.
Next, insert pre-seeded pods into each of your garden’s slots, pushing down gently until they click into place. Finally, plug in your AeroGarden and turn it on – within days you’ll start to see results!
Credit: www.houzz.com
How Do You Repot Aerogarden Tomatoes?
To repot Aerogarden tomatoes, start by gently lifting the plant out of its current container. Remove any excess soil and old roots from around the root ball. Next, place some fresh potting mix in a new container that is slightly larger than the original one.
Make sure to add sufficient drainage holes for water runoff before adding your plants. Place each tomato plant into the new container and fill it with additional potting soil until it reaches an inch below the rim of the planter. Water your plants thoroughly and make sure they get plenty of sunlight throughout their growth cycle.
Finally, maintain steady moisture levels in order to keep your Aerogarden tomatoes healthy and strong!
Can You Transfer Aerogarden Plants?
Yes, you can transfer AeroGarden plants. Before transferring the plant, it is important to make sure the new pot is deep enough and has excellent drainage. This will ensure that your plant will have plenty of room for its roots to grow and thrive in the new soil.
Additionally, be sure to use a quality potting mix as this will help maintain adequate levels of moisture and nutrients for your plants growth. When transferring the plant from its original container into its new home, carefully remove it from the old soil so as not to damage any of its root system or stem structure. Finally, water well after transplanting and allow time for your AeroGarden plant to adjust before resuming normal watering cycles.
How Do You Transfer Plants from Aerogarden to Soil?
To transfer plants from an AeroGarden to soil, begin by gently removing the plant from its growing pod and lightly tapping off any excess root material. Then fill a pot with a good quality potting mix and create a hole in the center about twice as wide and deep as the root ball of your plant. Place the roots into this hole, making sure that all of them are covered by soil.
Firmly compact the soil around it, then add additional soil if needed. Finally, water thoroughly until you see water coming out of holes at bottom of planter and give your new transplant plenty of light!
How Big Should Tomato Plants Be before Transplanting?
Tomato plants should be at least 6 inches tall before they are ready for transplanting. It is also important to make sure the plant has several sets of leaves, as this will help ensure that it can handle the stress of being moved and replanted. Additionally, you should wait until after your area’s last frost date to transplant tomato plants so that the temperature does not put them into shock.
Finally, once transplanted, remember to give your tomatoes plenty of water and fertilizer in order for them to continue growing strong!
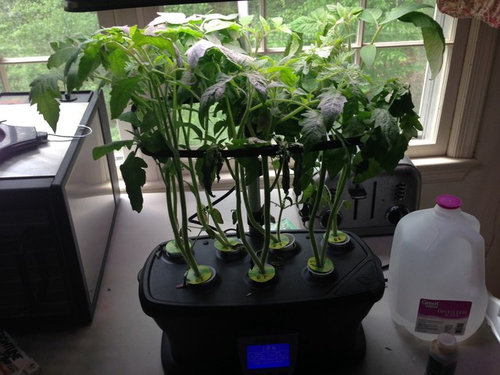
Transplanting tomatoes from an aerogarden to soil
Conclusion
Transplanting Aerogarden tomatoes can be a rewarding experience for any home gardener. Not only does it provide the opportunity to enjoy fresh, homegrown tomatoes in summer months, but it also offers an economical way to increase yields from your Aerogarden. With proper preparation and care, transplanting tomato plants can help you get the most out of your Aerogarden system with delicious results.